AL Catch Weight Management - User guide
How to set up and use the app in Business Central.
1. Concepts in one minute
- Catch weight means an item moves by count (pieces, cases) but is priced and costed by its real weight - typical of meat, cheese, fish, fresh produce.
- Each item carries two units of measure: a handling unit you operate in and an accounting unit you price and post in, usually a weight. The accounting unit is set on the item for sales, purchase and transfer, and every line can change its own.
- The company weighs in one weight unit, kilograms or pounds, and every weight is kept in it. Another weight unit can still be an accounting unit, for example pounds where the company weighs in kilograms: the accounting quantity is then the weight said in that unit. For that, both units of measure state how many kilograms they weigh (AL Foundation App).
- Every line carries a net weight: the one of the item card to start with, then the one you type or weigh. From the quantity and that weight the app derives the Accounting Quantity and the Accounting Unit Price, and keeps them in step down to the quantities to ship, receive and invoice. When the goods are posted, the weight on the line is the weight that moves: nothing makes up a weight nobody has weighed.
- The accounting price comes from the standard BC price lists - no separate pricing engine, the standard price events stay in place.
- Posting writes the net and gross weight into the Item Ledger Entries and keeps a Weight Ledger Entry for each application (inbound linked to outbound), so you can compare weight in versus weight out for shrinkage and yield.
2. Prerequisites
- Microsoft Dynamics 365 Business Central, version 28.3 or higher, online (SaaS) and on-premises. AppSource covers online environments; on-premises is distributed and installed directly by AppLibra, through the AppLibra License Manager.
- The dependencies installed: AL License and Trial Management, AL Foundation App, AL Tracking, AL Measure Calculation, AL Message Passing, AL Role Center.
- Permissions: two roles. ALPCWM-USER for whoever weighs, assigns lots and reads the weight ledger; ALPCWM-ADMIN for whoever configures the app, which includes the first one and adds the setup page and the deletion of weight ledger entries. The former single set ALPCWM stays valid for whoever already has it, and grants what it granted before, but new assignments go on the two roles. Worth knowing: the role center shows the setup action to everyone, so a user with the operational role only gets a permission error when clicking it. That is standard Business Central behaviour and cannot be worked around.
You reach the app from Tell Me (search "CWM" to list every page of the app, or directly "Weight Ledger Entries (CWM)", "Bin Weighings (CWM)", "Setup (CWM)"), from the Weigh action that the app adds to the relevant document and journal pages, and from the AppLibra role center (Shift+F12 -> Explore other roles -> AppLibra). The setup page is listed under Administration.
3. Setup
3.1 Activate the license
Open Setup (CWM) (the record is created on first open and a trial is registered automatically). Use Add License to enter a license when you have one.
3.2 Setup (CWM)
On Setup (CWM):
- Update Net Weight when Lots Are Assigned - when on, the net weight of the line is worked out again from the weighings every time lots are assigned. Leave it off where the weight is written once and must not move by itself.
- Sales Weight Check, Purchase Weight Check and Transfer Weight Check - what a line counted by weight must have when its goods are posted. No Check, the default, asks for nothing: a line with no weight is posted with no weight. Weight Required asks for a weight, wherever it comes from: the item card, a weight typed on the line, a weighing. Weighing Required asks that the whole quantity being posted has been weighed: the weight of the item card is not enough. The sales check applies when goods are shipped or come back, the purchase check when they are received or sent back, the transfer check when they are shipped, a direct transfer included.
Most of the configuration lives on the item, not here.
3.3 Configure the item
Open the Item Card for a variable-weight item. On the Catch Weight tab:
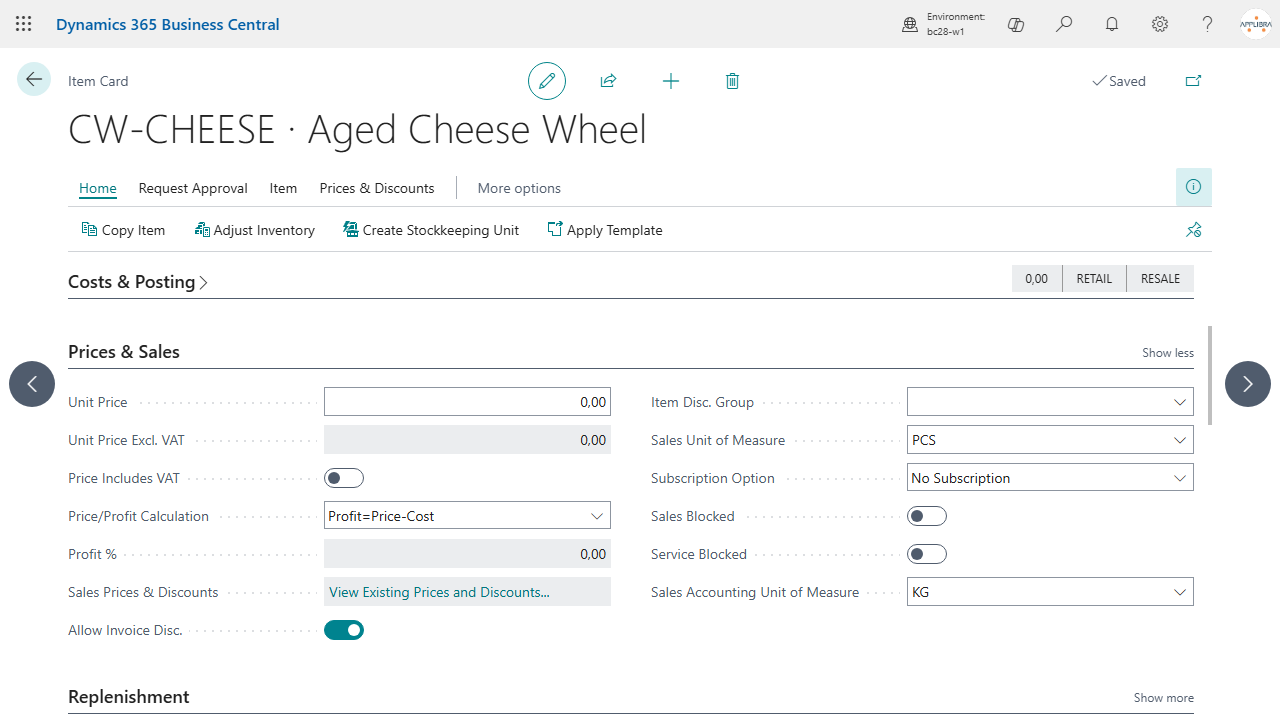
- Sales Accounting Unit of Measure, Purchase Accounting Unit of Measure and Transfer Accounting Unit of Measure - usually the weight unit of the company. A transfer line takes the sales one when the transfer one is blank.
- These accounting units are what the app prices and posts in; the item keeps trading in its base/handling unit (pieces, cases).
3.4 Billing by weight, or by count, customer by customer
There is no switch: the accounting unit of measure of the line decides. When BC works out the price, the app swaps the unit of the line for the accounting one for an instant, so the standard price lists find the price of that unit, and puts it back right after.
- To bill by weight, the accounting unit of the line is a weight unit (KG) and a price list line in KG is needed.
- To bill by count, the accounting unit is the handling unit (PCS) and a price list line in PCS is needed.
The accounting unit comes by default from the Item Card and can be changed on the single line: that is how the same item goes by weight for one customer and by count for another.
On a catch weight item, do not load price list lines with a blank unit of measure. The standard treats a line without a unit as valid for any unit, and among the candidates it picks by comparing amounts: a price written with pieces in mind ends up compared with prices per kilo. Load explicit lines, one for every unit you sell in.
3.5 Item tracking
Set up item tracking (lot, serial, package, pallet, external lot) as usual through AL Tracking. The weigh screens show exactly the tracking dimensions the item's tracking code enables.
4. Daily use
4.1 A sales line priced by weight
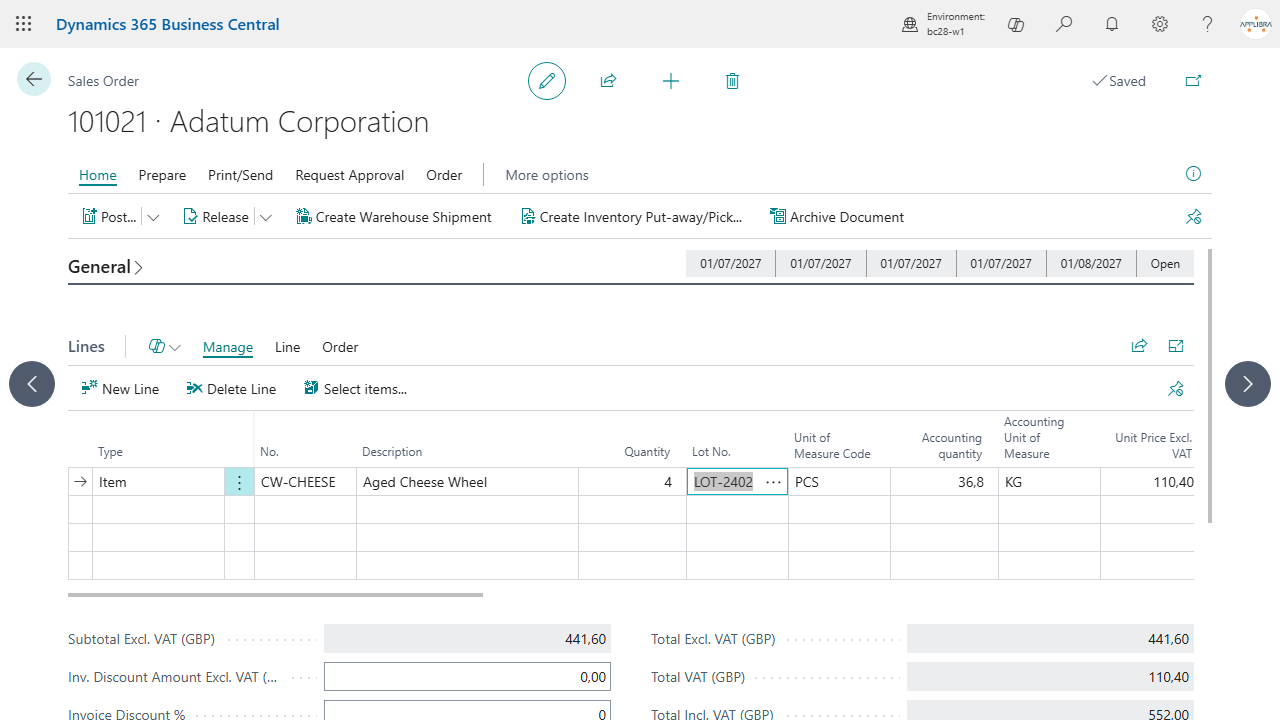
- On a sales order, add the item and enter the quantity in the handling unit (for example cases).
- The line now shows Accounting Quantity and Accounting Unit of Measure next to the unit of measure, and Accounting Unit Price next to the unit price.
- Capture the weight: on the line, run Weigh (Shift+Ctrl+G). The Weigh (CWM) page opens; enter the quantity and the Net Weight of what you weigh, and run Weigh. The weighing is accounted in the accounting unit of the line. The Gross Weight follows on its own, because weighing measures the goods and not the packaging around them: it is the net weight you just captured plus the tare.
- The app computes the Accounting Quantity from the weight and reads the Accounting Unit Price from the standard price lists for the accounting unit; the line total reflects the real weight.
- Changed the quantity later, or shipped part of the line? Run Update Net Weight on the line: it works out the net weight again from the weighings on it, the weight of what is weighed and still to be shipped. Purchase and transfer lines have the same action.
- Invoice from the shipment or from the order, as you prefer: either way the invoice bills the weight each shipment left with, not the weight the order line shows at that moment.
4.2 Weigh and assign lots in one step
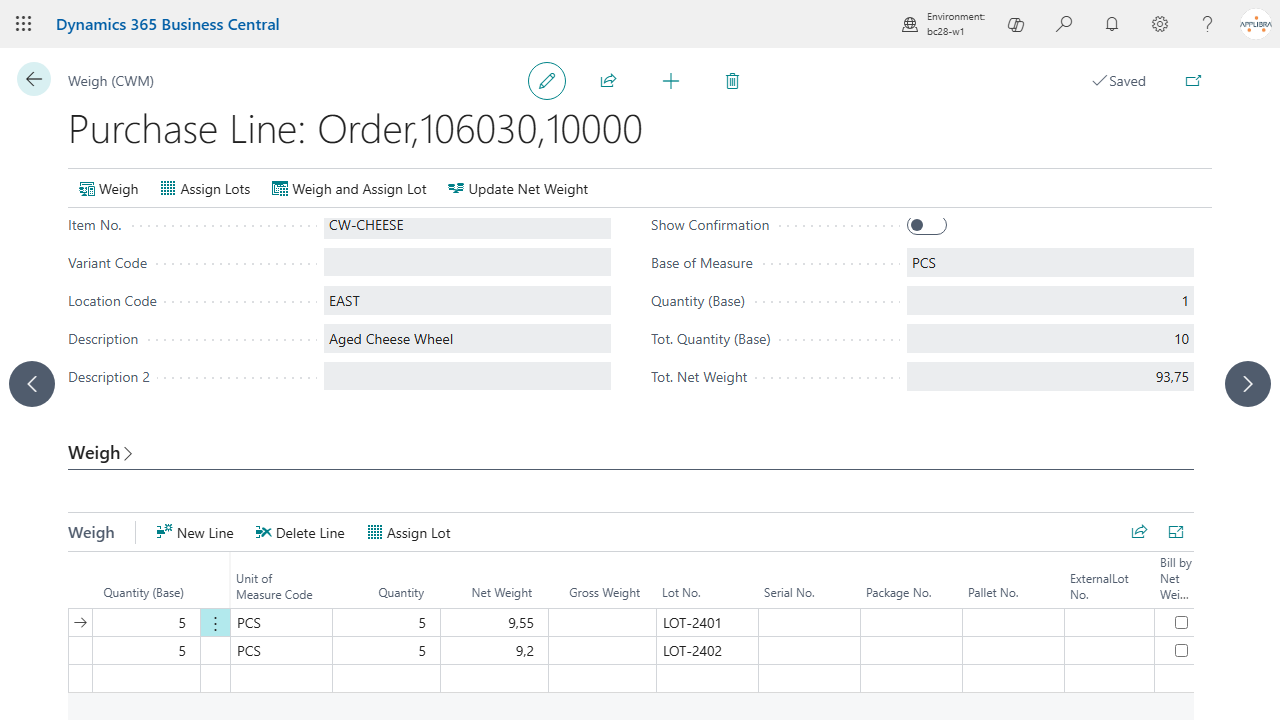
When the item is lot/package/pallet tracked, the Weigh (CWM) page lets you both capture weight and assign tracking:
- Open Weigh on the line. The lower Weigh list holds one row per tracking combination (lot, serial, package, pallet, external lot), each with its own quantity and net/gross weight. Weighing the same combination again adds to its row, which keeps the average weight of all its weighings; a line without tracking has one row.
- Use the actions of the page:
- Weigh - records what you typed as one weighing;
- Assign Lots - spreads the weighings over the lots and writes the tracking back to the line;
- Weigh and Assign Lots - does both at once;
- Update Net Weight - writes the total net weight of the weighings back to the line.
- The captured weight flows back to the line and, on assign, the tracking is written through AL Tracking.
4.3 Purchase, transfer, production, inventory, warehouse
The same Weigh action is available wherever a variable-weight item moves:
- Purchase order and Purchase return order lines, Sales return order and Sales credit memo lines, Transfer order lines;
- Warehouse receipt and Warehouse shipment lines;
- Item Journal, Item Reclassification Journal and Physical Inventory Journal;
- Consumption Journal, Output Journal and Production Journal: the output is weighed where it is posted.
The item, reclassification, consumption, output and production journals also show on the line the Net Weight of one base unit and the Total Net Weight of the whole line: type either one to state the real weight.
In each case you enter the handling quantity, capture the weight, and let the app keep the accounting quantity and price aligned. The accounting unit and quantity are also carried over when a document is copied. A few rules hold everywhere:
- A line that has weighings keeps its item, variant, type and unit of measure. To change them, delete the weighings first: the weight they hold would no longer describe the line.
- Transfers. The goods leave at the weight of the line. In transit and at the destination their weight stays at the location where the goods are, with their lot. The receipt brings them in at the weight they were shipped with; only a weighing taken for the receipt gives them a weight of their own, and then the difference stays as a weight loss on the in-transit location. A direct transfer posted in one step moves the goods at the weight of its line.
- Reclassification. The goods move at the weight of the line.
4.4 Post and analyse
- Post the document as usual. The net and gross weight land in the Item Ledger Entries, visible in the Applied Net Weight column (the entries page also carries its own Weigh action, Shift+Ctrl+G).
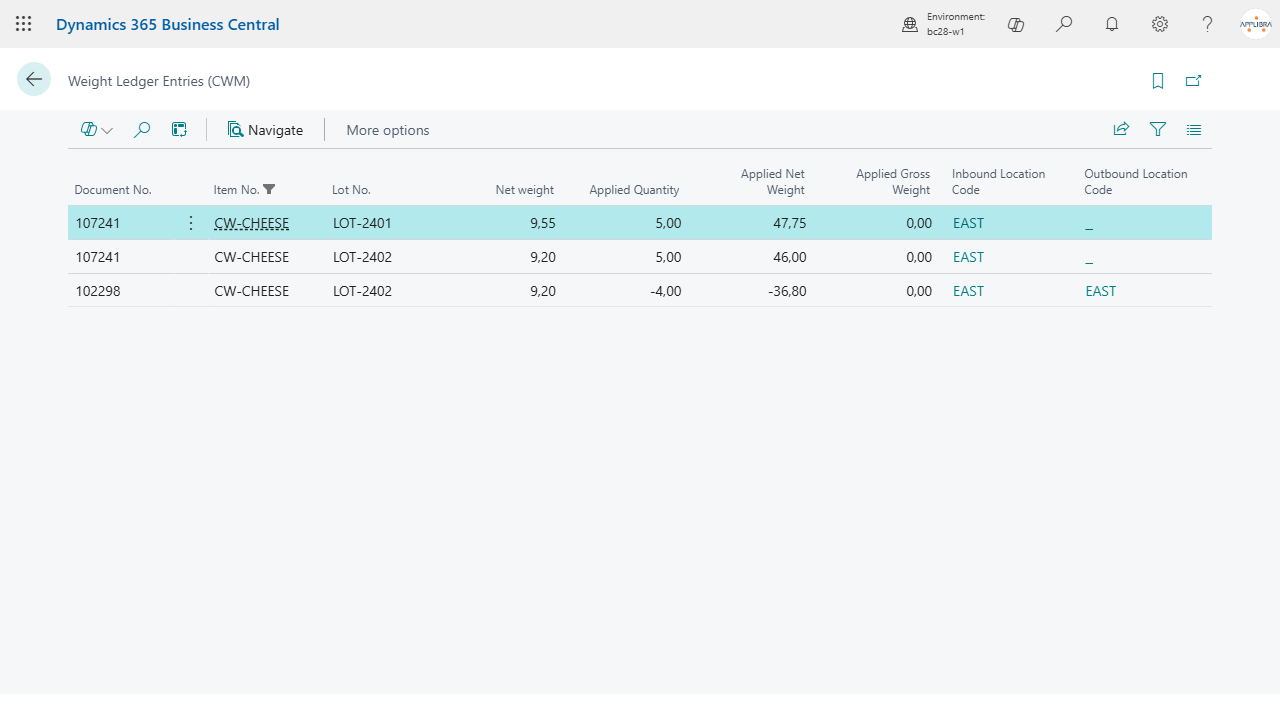
- For every Item Application Entry the app creates a Weight Ledger Entry that links the inbound and outbound entries and records the Applied Net Weight and Applied Gross Weight. The Entry Type column says what the entry is: Inbound, Outbound or Weight Loss.
- When an inbound entry is used up and still has net weight on the books, posting writes a Weight Loss entry with no quantity that clears it, dated as the outbound that closed it: the weight in stock never contains the weight of goods that are gone. Net weight only, never gross; nothing for rounding differences; per inbound entry, not per lot. Removing an application in the item application worksheet removes its weight loss too.
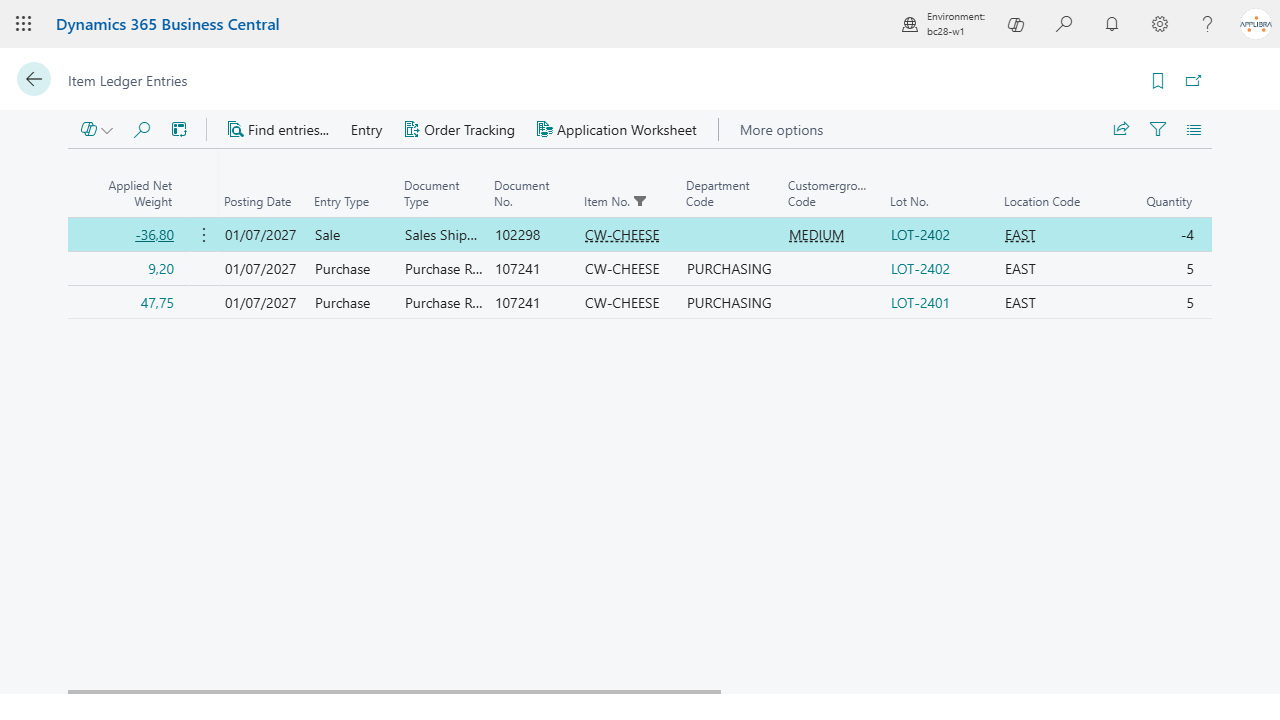
- Open Weight Ledger Entries (CWM) to read the applied weights, compare inbound versus outbound weight for shrinkage and yield, and use Navigate to list every entry and document for a document number and posting date.
4.5 Bins that keep weighings
On a bin flagged Keep Weighings (on the Bins page), goods moved in with a weighing keep the weight they were weighed with until they leave the bin or are consumed. The weighing is handed over by the process that moves the goods into the bin; Catch Weight keeps it and uses it up, oldest first, whatever road the goods leave by. When the consumption of a production order is calculated, the weight of what is taken from the bin comes from those weighings. Only the weighings of goods that entered the bin count: the weighing of a document or journal line that names the bin is not goods in the bin. Bin Weighings (CWM) lists what is waiting in each bin.
5. Where to find it
- Tell Me: search "CWM" (every page of the app is tagged), or directly "Weight Ledger Entries (CWM)", "Bin Weighings (CWM)" and "Setup (CWM)".
- On documents and journals: the Weigh action on sales and purchase order lines, sales and purchase return order lines, sales credit memo lines, transfer order lines, warehouse receipt and shipment lines, the item, reclassification, physical inventory, consumption, output and production journals, and on Item Ledger Entries; Update Net Weight on sales, purchase and transfer order lines.
- Item Card: the Catch Weight tab, with the sales, purchase and transfer accounting units of measure.
- Item type card (AL Foundation App): the Weight Proposal Rule.
- Bins: the Keep Weighings flag.
- Role centers: a Catch Weight (CWM) group (Setup + Weight Ledger Entries) on the warehouse role center and on the AppLibra hub.
- AppLibra hub: Shift+F12 -> Explore other roles -> AppLibra.
- Manual Setup: the setup page is registered in the Manual Setup list.
- Administration: the setup page is listed there.
6. Tips and troubleshooting
- The accounting columns are hidden. The Accounting Quantity, Accounting Unit of Measure and Accounting Unit Price show only when an accounting unit is set on the item and it differs from the handling unit. Set the accounting units on the Catch Weight tab of the Item Card.
- No price on the accounting line. The accounting unit price is read from the standard BC price lists for the accounting unit; make sure a price exists for that unit of measure. No custom pricing engine is involved.
- The same item by weight for some customers and by count for others. Change the accounting unit of measure on the line: KG for who buys by weight, the handling unit for who buys by count. A price list line is needed for each of the two units.
- Require the weight, or the weighing, before posting. Set the weight checks in Setup (CWM) (see 3.2), separately for sales, purchases and transfers.
- Weight from a scale. There is no scale driver: the weight is typed, or it arrives from a GS1-128 label through AL GS1.
- The proposed weight of a lot is too high for goods that dry out. Set Last Weighing as the Weight Proposal Rule of their item type (see 3.3): the residual charges the loss of what has left to what is still there.
- The unit of measure of a line cannot be changed. The line has weighings: delete them first, then change the unit, then weigh again. The same holds for the item, the variant and the type of the line.
- No gross weight is proposed. The gross weight is the captured net plus the tare, and the tare has to be stated somewhere: normally the Gross Weight of the item card. When nothing states it, the app does not make one up. You can also correct the gross weight by hand once on the weighing: that states the tare of that packaging, and the weighings that follow keep it.
- Net weight not refreshing when I assign lots. Turn on Update Net Weight when Lots Are Assigned in the setup so the net weight is recomputed from the weighings.
- Reading shrinkage/yield. Compare the inbound and outbound Applied Net Weight on the Weight Ledger Entries, and read the Weight Loss entries; each entry links the two item ledger entries.
7. Support and resources
- Publisher: AppLibra - https://applibra.com
- Apps catalog: https://applibra.com/apps
- Privacy policy: https://applibra.com/privacy-policy
- Terms of use: https://applibra.com/terms